# 【使用指南】在 Kubernetes 上部署读写分离的 GreptimeDB 集群
Source: https://greptime.cn/blogs/2025-03-27-read-write-separation
## 引言:读写分离的价值
在时序数据库场景中,读写操作往往呈现明显的工作负载差异:高频写入的指标采集与复杂的分析查询并存。GreptimeDB 通过 **Frontend 节点分组**实现物理隔离:
- 写节点组:专注处理高吞吐写入请求;
- 读节点组:承载复杂查询负载,支持内存加速与索引预取;
- 流量隔离:避免资源竞争导致的性能抖动,提升 SLA 保障等级;
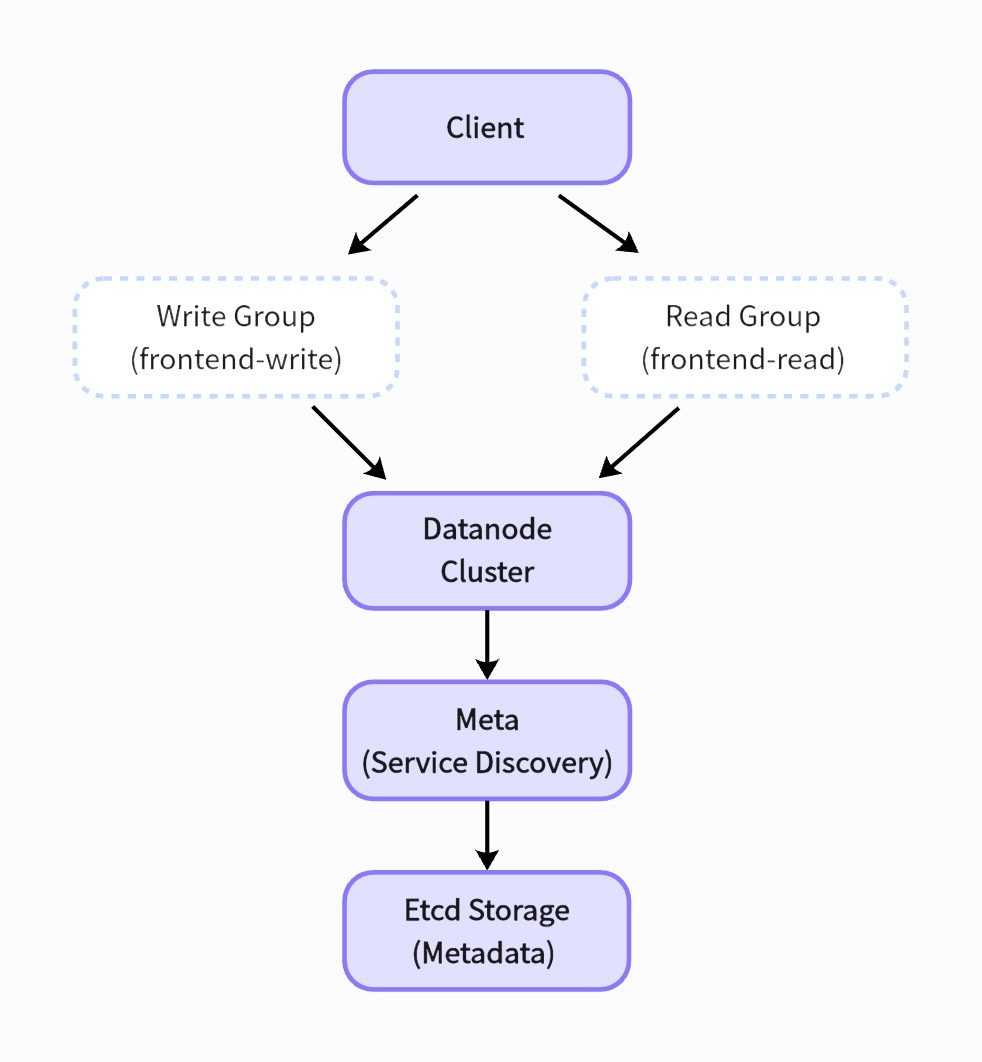 (图 1:GreptimeDB 架构图)
组件说明:
1. Frontend 节点组:承担 SQL 解析与请求路由
- Write Group:承接 `INSERT`/`CREATE` 等写操作
- Read Group:处理 `SELECT`/`JOIN` 等读操作
2. Datanode 集群:分布式存储引擎,采用列式存储+时间分片
3. Meta 集群:服务发现与拓扑管理,内置故障转移机制
4. Etcd:持久化存储集群元数据
该架构通过分离读写路径实现**线性扩展能力**,配合 Kubernetes 的弹性调度特性,可动态调整各节点组的副本数量以**应对业务波动**。为了优化复杂查询的处理,读节点组可以进一步划分,以分开长时间范围的历史数据查询和告警查询等请求。
本文将详细讲解如何使用 Helm Chart 在 Kubernetes 上部署可以**读写分离**的 Frontend 节点的 GreptimeDB[1]集群。
通过分步操作演示,用户将掌握 Helm 环境配置、etcd 存储部署、Operator 管理 GreptimeDB 集群等技能,并完成 GreptiemDB 集群的读写验证。本方案通过读写分离设计优化负载分配,适用于**大规模时序数据处理**场景。
## 环境准备
### 1. 配置 Helm Chart 工具
根据[安装文档](https://helm.sh/docs/intro/install/)安装需要的 Helm 工具。在部署应用程序前将[`greptime 仓库`](https://github.com/GreptimeTeam/helm-charts)添加到 Helm 中,仓库内包含了一系列可用的 Helm Charts。
使用以下命令将 `greptime 仓库` 添加到 Helm:
```bash
helm repo add greptime https://greptimeteam.github.io/helm-charts/
helm repo update
```
执行以下命令浏览可用的 Helm Charts:
```bash
helm search repo greptime --devel -l
```
## 组件部署
### 2.1 安装 etcd
执行高可用 etcd 集群安装(建议生产环境使用 3 节点以上):
```bash
helm upgrade \
--install etcd oci://registry-1.docker.io/bitnamicharts/etcd \
--set replicaCount=3 \
--set auth.rbac.create=false \
--set auth.rbac.token.enabled=false \
--create-namespace \
-n etcd-cluster
```
检查 etcd 的部署状态:
```bash
kubectl get po -n etcd-cluster
NAME READY STATUS RESTARTS AGE
etcd-0 1/1 Running 0 4m15s
etcd-1 1/1 Running 0 4m15s
etcd-2 1/1 Running 0 4m15s
etcd-pre-upgrade-5rmcf 0/1 Completed 0 32d
```
### 2.2 安装 `greptimedb-operator`
请确保使用的 `greptimedb-operator` 镜像版本大于等于 `v0.2.1-alpha.1`,并且 Helm Chart 版本大于等于 `0.2.18`:
```bash
helm upgrade \
--install \
--create-namespace \
greptimedb-operator greptime/greptimedb-operator \
-n greptimedb-admin
```
检查 `greptimedb-operator` 的安装状态:
```bash
kubectl get po -n greptimedb-admin
NAME READY STATUS RESTARTS AGE
greptimedb-operator-57b65f775-mjjs9 1/1 Running 0 19s
```
### 2.3 安装 `greptimedb-cluster`
在安装 GreptimeDB 集群之前,需要创建一个配置文件 `greptimedb-values.yaml`,内容如下:
```yaml
image:
registry: docker.io
repository: greptime/greptimedb
tag: "v0.13.0"
initializer:
registry: docker.io
repository: greptime/greptimedb-initializer
tag: v0.2.1-alpha.1
frontends:
- name: read
replicas: 1
- name: write
replicas: 1
meta:
replicas: 1
etcdEndpoints: "etcd.etcd-cluster.svc.cluster.local:2379"
datanode:
replicas: 1
frontend:
enabled: false
```
安装 GreptimeDB 集群:
```bash
helm upgrade \
--install greptimedb \
greptime/greptimedb-cluster \
-n default \
--values greptimedb-values.yaml
```
检查 `greptimedb-cluster` 的安装状态:
```bash
kubectl get po -n default
NAME READY STATUS RESTARTS AGE
greptimedb-datanode-0 1/1 Running 0 19s
greptimedb-frontend-read-57d56c5b57-659qh 1/1 Running 0 13s
greptimedb-frontend-write-f5765fbcc-pbcm2 1/1 Running 0 13s
greptimedb-meta-5645bf97d6-vksdg 1/1 Running 0 7m37s
```
```bash
kubectl get service -n default
NAME TYPE CLUSTER-IP EXTERNAL-IP PORT(S) AGE
greptimedb-datanode ClusterIP None 4001/TCP,4000/TCP 6m21s
greptimedb-frontend-read ClusterIP 10.96.224.187 4001/TCP,4000/TCP,4002/TCP,4003/TCP 5m3s
greptimedb-frontend-write ClusterIP 10.96.126.53 4001/TCP,4000/TCP,4002/TCP,4003/TCP 5m3s
greptimedb-meta ClusterIP 10.96.180.218 3002/TCP,4000/TCP 12m
```
## 读写测试
### 3.1 端口转发配置
建立读写节点访问通道:将读 Frontend 节点的 MySQL 端口转发到本地的 6002 端口,并将写 Frontend 节点的 MySQL 端口转发到本地的 7002 端口👇
```bash
kubectl port-forward svc/greptimedb-frontend-read -n default 6002:4002 > connections.out &
kubectl port-forward svc/greptimedb-frontend-write -n default 7002:4002 > connections.out &
```
### 3.2 写入数据
连接写 Frontend 节点:
```bash
mysql -h 127.0.0.1 -P 7002
```
```sql
mysql> CREATE TABLE monitor (
-> host STRING,
-> ts TIMESTAMP DEFAULT CURRENT_TIMESTAMP() TIME INDEX,
-> cpu FLOAT64 DEFAULT 0,
-> memory FLOAT64,
-> PRIMARY KEY(host));
Query OK, 0 rows affected (0.15 sec)
```
```sql
mysql> INSERT INTO monitor
-> VALUES
-> ("127.0.0.1", 1702433141000, 0.5, 0.2),
-> ("127.0.0.2", 1702433141000, 0.3, 0.1),
-> ("127.0.0.1", 1702433146000, 0.3, 0.2),
-> ("127.0.0.2", 1702433146000, 0.2, 0.4),
-> ("127.0.0.1", 1702433151000, 0.4, 0.3),
-> ("127.0.0.2", 1702433151000, 0.2, 0.4);
Query OK, 6 rows affected (0.08 sec)
```
### 3.3 读取数据
连接读 Frontend 节点:
```bash
mysql -h 127.0.0.1 -P 6002
```
```sql
mysql> select * from monitor;
+-----------+---------------------+------+--------+
| host | ts | cpu | memory |
+-----------+---------------------+------+--------+
| 127.0.0.1 | 2023-12-13 02:05:41 | 0.5 | 0.2 |
| 127.0.0.1 | 2023-12-13 02:05:46 | 0.3 | 0.2 |
| 127.0.0.1 | 2023-12-13 02:05:51 | 0.4 | 0.3 |
| 127.0.0.2 | 2023-12-13 02:05:41 | 0.3 | 0.1 |
| 127.0.0.2 | 2023-12-13 02:05:46 | 0.2 | 0.4 |
| 127.0.0.2 | 2023-12-13 02:05:51 | 0.2 | 0.4 |
+-----------+---------------------+------+--------+
6 rows in set (0.07 sec)
```
> ### 生产建议
>
> 1. 拓扑扩展:根据负载动态调整 `datanode.replicas` 和 `frontends[*].replicas`;
> 2. 存储配置:为 datanode 挂载持久化卷(PVC)
> 3. 监控集成:对接 Prometheus 采集 `greptimedb-cluster-metrics` 指标;
> 4. 网络优化:使用 LoadBalancer 类型服务进行负载均衡。
> 完整部署示例代码参见 [GreptimeDB Helm Charts 仓库](https://github.com/GreptimeTeam/helm-charts)。
## 小结
至此,我们进行了**从环境配置、依赖组件安装、GreptimeDB 集群部署到数据读写测试**的完整实践,使用 Helm Chart 在 Kubernetes 上部署 GreptimeDB 集群,并配置了读写分离的 Frontend 节点。
在实际应用中,用户可以**根据业务需求调整节点数量和参数配置**,进一步提升 GreptimeDB 的性能和可用性。
## 关于 Greptime
[Greptime 格睿科技](https://greptime.cn/)专注于为可观测、物联网及车联网等领域提供实时、高效的数据存储和分析服务,帮助客户挖掘数据的深层价值。目前基于云原生的时序数据库 [GreptimeDB](https://github.com/GreptimeTeam/greptimedb) 已经衍生出多款适合不同用户的解决方案,更多信息或 demo 展示请联系下方小助手(微信号:greptime)。
欢迎对开源感兴趣的朋友们参与贡献和讨论,从带有 good first issue 标签的 issue 开始你的开源之旅吧~期待在开源社群里遇见你!添加小助手微信即可加入“技术交流群”与志同道合的朋友们面对面交流哦~
Star us on GitHub Now: https://github.com/GreptimeTeam/greptimedb
官网:https://greptime.cn/
文档:https://docs.greptime.cn/
Twitter: https://twitter.com/Greptime
Slack: https://greptime.com/slack
LinkedIn: https://www.linkedin.com/company/greptime/