# 使用 CloudFlare 保护 GreptimeDB 的 gRPC 服务
Source: https://greptime.cn/blogs/2025-09-02-cloudflare-greptimedb-grpc
## Cloudflare 介绍
**Cloudflare 是一家提供内容分发网络(CDN)和网络安全服务的公司,通过一系列工具和技术帮助用户优化网站性能、增强安全性和提高可用性**。它通过全球数据中心网络加速网站加载时间,防护 DDoS 攻击,以及提供 SSL 加密、域名解析和流量分析等功能,使得在线资源更加高效和可靠。无论是个人网站还是企业级应用,Cloudflare 都能为不同规模的项目提供灵活的解决方案。
本文将介绍如何使用 Cloudflare 作为 GreptimeDB 的反向代理,从而提高服务的安全性并提供更加强大的访问审计和分析服务。
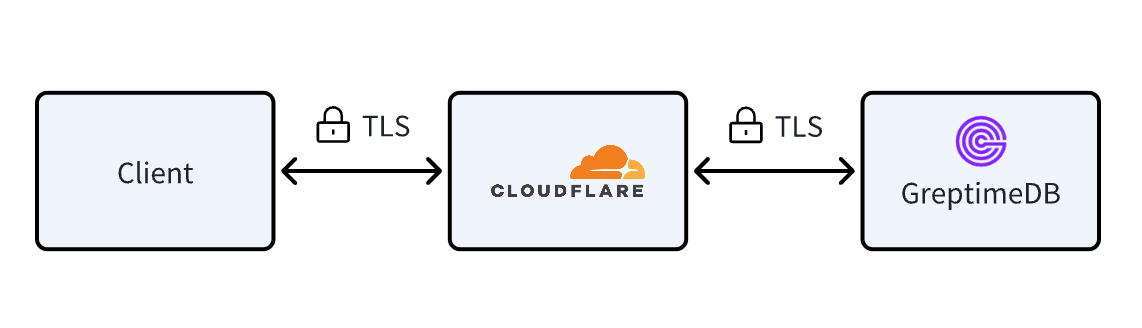 (图 1:Cloudflare 作为 GreptimeDB 的反向代理)
## Cloudflare 配置
### 托管域名
首先确保服务端的域名已经按照[文档中描述的步骤](https://developers.cloudflare.com/fundamentals/manage-domains/)正确托管到 Cloudflare 并且将[域名的代理状态](https://developers.cloudflare.com/dns/proxy-status/)设置为 Proxied (或者称为 Orange Clouded),如下图所示。在本文中我们举例使用的是 grpc.some-domain.com,它的 DNS 记录是一条 A 记录,指向我们 GreptimeDB 数据库所在的机器的 IP。
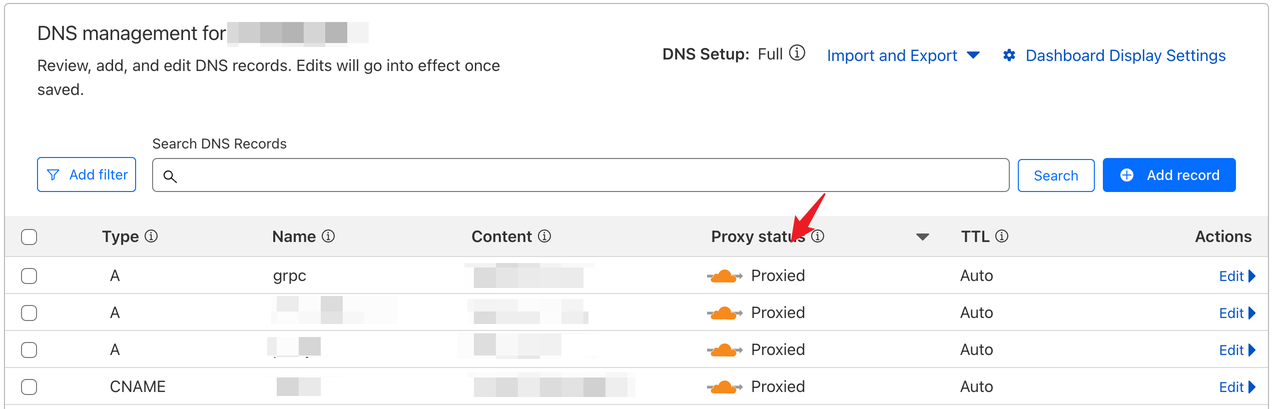 (图 2:域名托管示例)
### 打开 gRPC 代理开关
默认情况下 CloudFlare 并未启用 gRPC 服务的代理功能,需要用户在域名的 Network 页面手动启用 [gRPC 代理](https://developers.cloudflare.com/network/grpc-connections/),具体位置见下图:
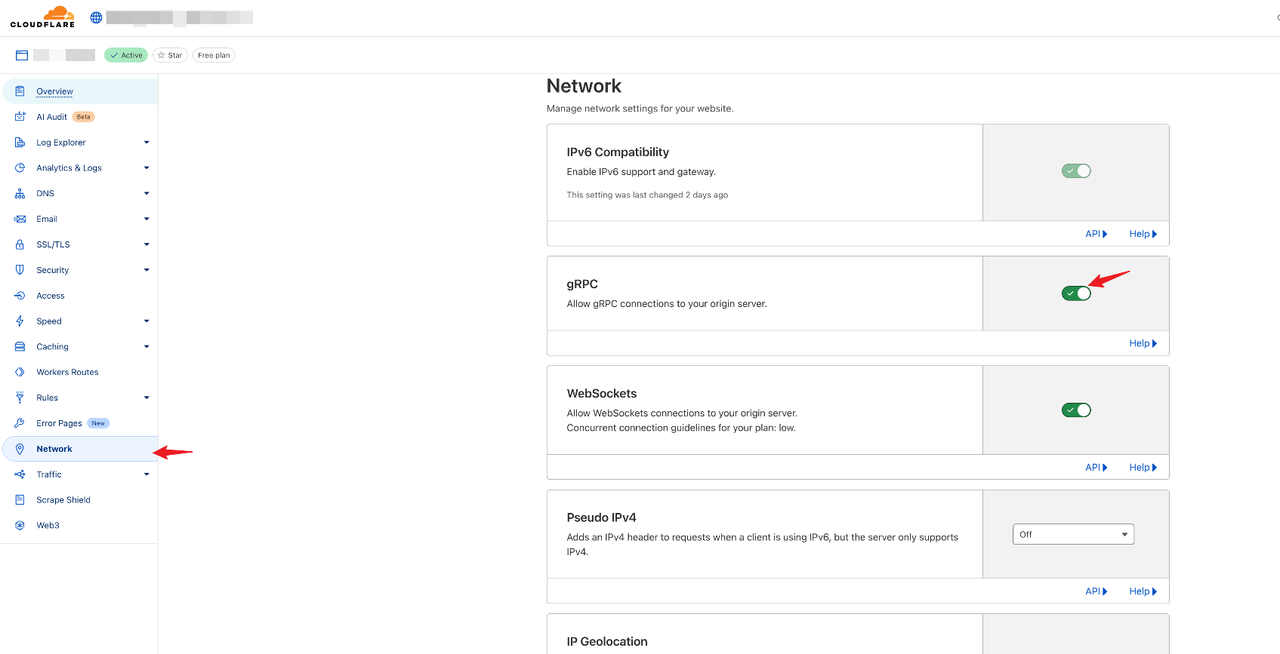 (图 3:用户在域名的 Network 页面手动启用 gRPC 代理)
### 配置 SSL 证书
进入域名控制台侧边栏的 SSL/TLS 页面,确认[加密模式](https://developers.cloudflare.com/ssl/origin-configuration/ssl-modes/)为 [Full](https://developers.cloudflare.com/ssl/origin-configuration/ssl-modes/full/),即客户端到 CloudFlare、CloudFlare 到源服务器的连接均使用 TLS 加密。
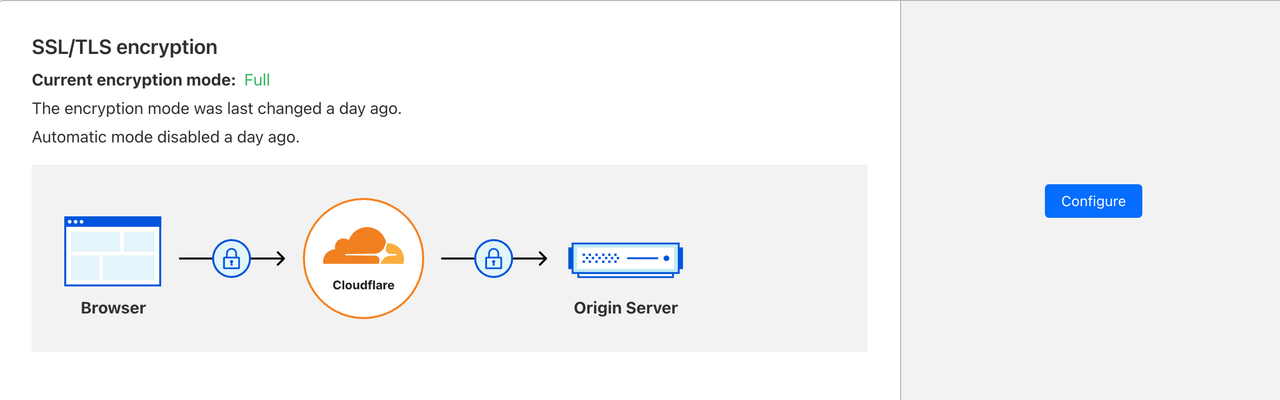 (图 4:进入域名控制台侧边栏的 SSL/TLS 页面)
然后进入侧边栏 SSL/TLS 下的 Origin Server (源服务器)配置页面,点击 Create Certificate 创建证书:
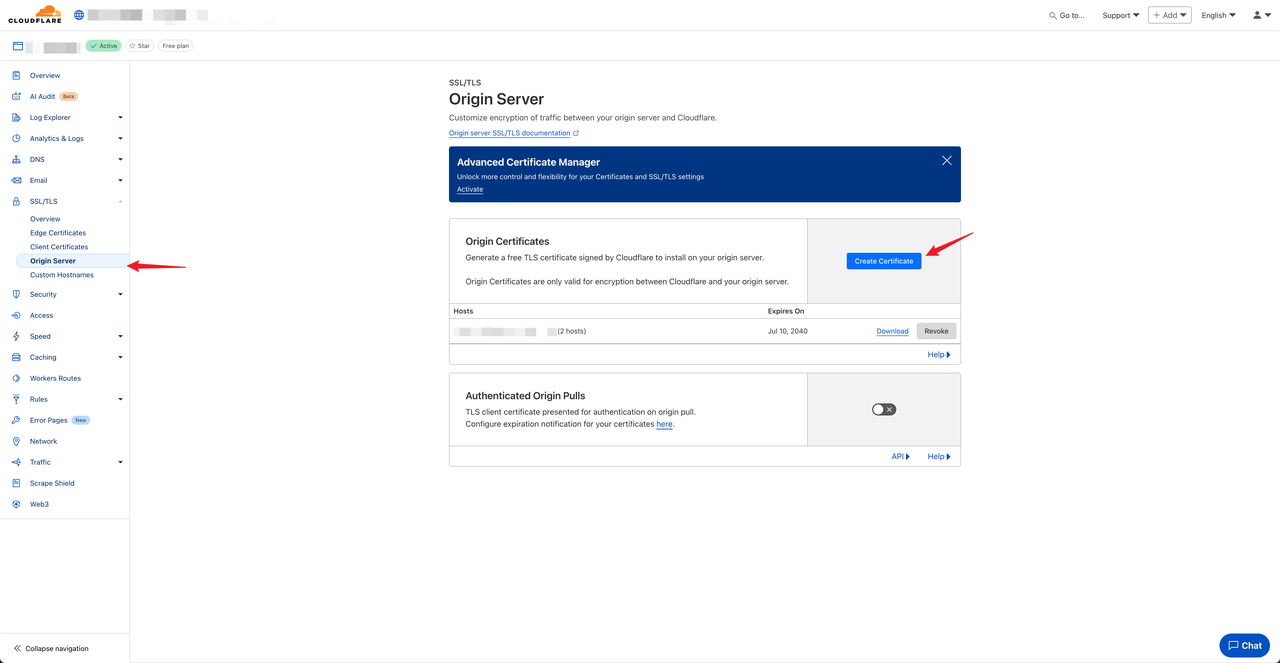 (图 5:进入配置页面创建证书)
然后使用默认配置创建证书:
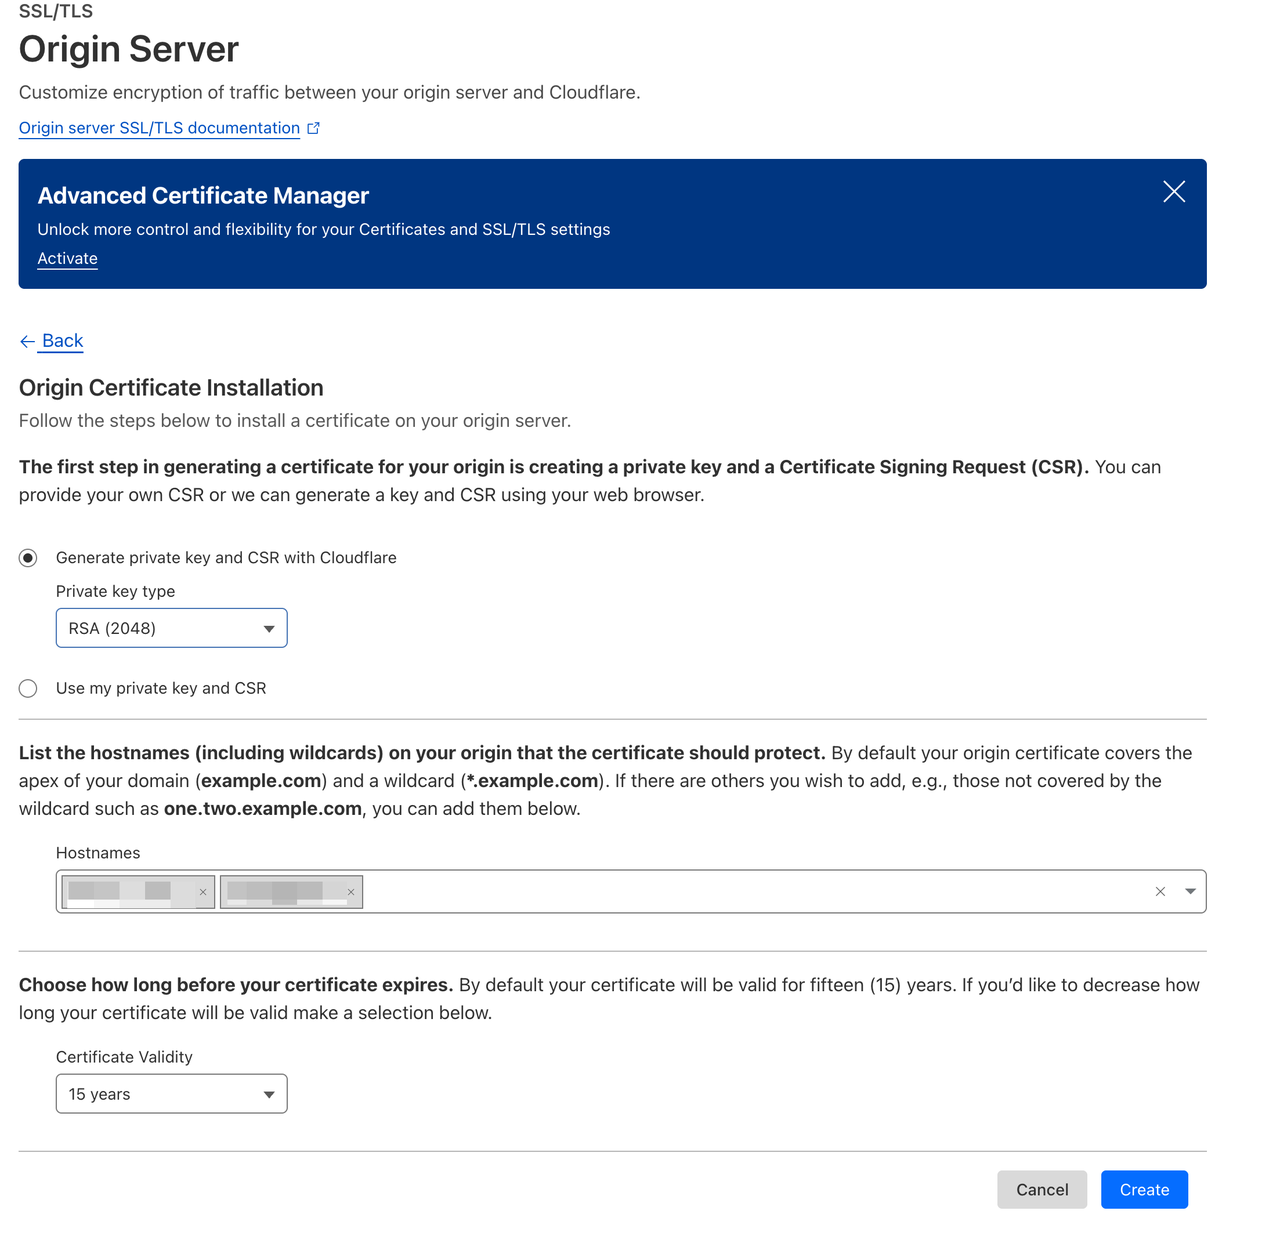 (图 6:使用默认配置创建证书)
点击 Create 后即可看到 CloudFlare 生成的证书和私钥,请妥善保存。
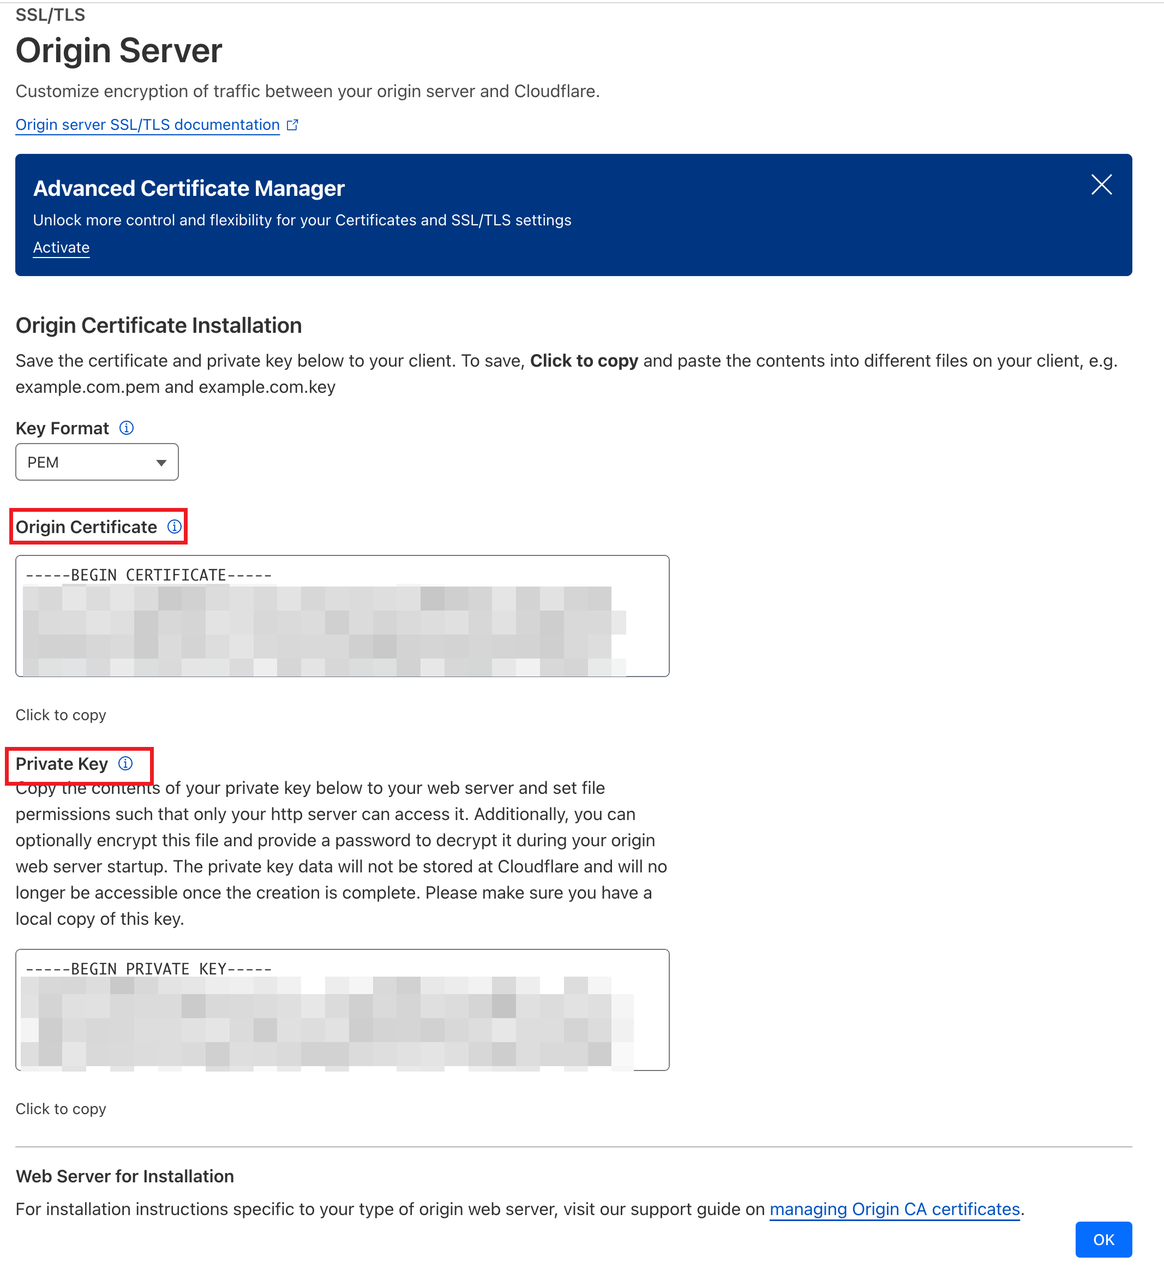 (图 7:CloudFlare 生成的证书和私钥)
> 注:具体步骤请参考 [CloudFlare Docs - Cloudflare origin CA](https://developers.cloudflare.com/ssl/origin-configuration/origin-ca/).
## 安装服务端证书并修改 GreptimeDB 配置文件
在 GreptimeDB 服务器上,将上述步骤生成的证书和私钥保存到安全的目录中,如 `/etc/ssl/certs/greptimedb.crt` 和 `/etc/ssl/private/greptimedb.key`。
然后修改 GreptimeDB 的配置文件,在 `[grpc]` 部分中,需要修改如下字段:
```toml
[grpc]
bind_addr = "0.0.0.0:443"
[grpc.tls]
mode = "require"
cert_path = "/etc/ssl/certs/greptimedb.crt"
key_path = "/etc/ssl/private/greptimedb.key"
```
> 注:
> - 由于 CloudFlare 仅支持对 443 端口的 TLS 流量代理,因此我们需要把 gRPC 的端口设置为 443;
> - Grpc 的 TLS 模式设置为 `required`,`cert_path` 和 `key_path` 分别为证书和私钥地址。
## 使用安全的 TLS 连接写入数据
在配置好 CloudFlare 代理和服务端的证书后,客户端只需要指定使用 TLS 即可通过安全连接向 GreptimeDB 写入数据。本节中以 [GreptimeDB 的 Java Ingester SDK](https://github.com/GreptimeTeam/greptimedb-ingester-java)为例,在创建 GreptimeDB 客户端配置 `GreptimeOptions` 时,需要指定使用 TLS (见示例代码的第 18 行):
```java
public class LowLevelApiWriteQuickStart {
private static final Logger LOG = LoggerFactory.getLogger(LowLevelApiWriteQuickStart.class);
public static void main(String[] args) throws ExecutionException, InterruptedException {
GreptimeOptions opts = GreptimeOptions.newBuilder("grpc.huanglei.rocks:443", "public") // Optional, the default value is fine.
.asyncPool(new SerializingExecutor("async_pool"))
.rpcOptions(RpcOptions.newDefault())
.writeMaxRetries(1)
.maxInFlightWritePoints(10 * 65536)
.writeLimitedPolicy(LimitedPolicy.defaultWriteLimitedPolicy())
.defaultStreamMaxWritePointsPerSecond(10 * 65536)
.useZeroCopyWriteInBulkWrite(true)
.routeTableRefreshPeriodSeconds(-1)
.checkHealthTimeoutMs(1000)
.router(null)
.authInfo(AuthInfo.noAuthorization())
// 指定使用 TLS 验证服务端身份,此处使用默认配置,也就是读取系统的 CA 证书
.tlsOptions(new TlsOptions())
.build();
final GreptimeDB greptimeDB = GreptimeDB.create(opts);
TableSchema cpuMetricSchema = TableSchema.newBuilder("cpu_metric")
.addTag("host", DataType.String)
.addTimestamp("ts", DataType.TimestampMillisecond)
.addField("cpu_user", DataType.Float64)
.addField("cpu_sys", DataType.Float64)
.build();
TableSchema memMetricSchema = TableSchema.newBuilder("mem_metric")
.addTag("host", DataType.String)
.addTimestamp("ts", DataType.TimestampMillisecond)
.addField("mem_usage", DataType.Float64)
.build();
Table cpuMetric = Table.from(cpuMetricSchema);
Table memMetric = Table.from(memMetricSchema);
for (int i = 0; i < 10; i++) {
String host = "127.0.0." + i;
long ts = System.currentTimeMillis();
double cpuUser = i + 0.1;
double cpuSys = i + 0.12;
cpuMetric.addRow(host, ts, cpuUser, cpuSys);
}
for (int i = 0; i < 10; i++) {
String host = "127.0.0." + i;
long ts = System.currentTimeMillis();
double memUsage = i + 0.2;
memMetric.addRow(host, ts, memUsage);
}
cpuMetric.complete();
memMetric.complete();
CompletableFuture> future = greptimeDB.write(cpuMetric, memMetric);
Result result = future.get();
Result simpleResult =
result.map(WriteOk::getSuccess).mapErr(err -> err.getError().getMessage());
if (simpleResult.isOk()) {
LOG.info("Write success: {}", simpleResult.getOk());
} else {
LOG.error("Failed to write: {}", simpleResult.getErr());
}
List
delete_objs = Arrays.asList(cpuMetric.subRange(0, 5), memMetric.subRange(0, 5));
// We can also delete data from the table using the `WriteOp.Delete`.
Result deletes =
greptimeDB.write(delete_objs, WriteOp.Delete).get();
if (deletes.isOk()) {
LOG.info("Delete result: {}", result.getOk());
} else {
LOG.error("Failed to delete: {}", result.getErr());
}
greptimeDB.shutdownGracefully();
}
}
```
## 结语
本文介绍了如何使用 CloudFlare 作为 GreptimeDB gRPC 服务的反向代理,并且利用端到端的 TLS 加密功能保护数据安全并且利用 CloudFlare 代理网络**隐藏后端服务的真实地址从而进一步提高安全性和可审计性**。值得注意的是,CloudFlare 默认提供单个域名的托管和代理服务,并且只能免费生成单个 Let's Encrypt 的证书。如果您需要托管多个域名或者使用自定义的 SSL 证书,请升级到 [CloudFlare 的 Business Plan](https://www.cloudflare.com/zh-cn/plans/business/)或升级 [Advanced Certificate Manager](https://developers.cloudflare.com/ssl/edge-certificates/advanced-certificate-manager/)。